
Navisworks Manage - Training Course
Master project coordination, clash detection, 4D simulation, and model analysis with Autodesk Navisworks at ETC Lebanon.
Duration: 16 hours
Teaching Methodology: Hands on
Course Schedule: Schedule
Fees $350
Course Mode: Blended Face-to-face or online via Zoom
Weekly (8 sessions) |
 |
 |
 |
DESCRIPTION
This Navisworks® course teaches you about coordination, construction simulation, and whole-project analysis for integrated project review. You will also learn advanced tools to simulate and optimize scheduling, identify and coordinate clashes and interferences, collaborate, and gain insight into potential problems.
OVERVIEW
Participants who take this course will learn how to:
- Integrate Models
- Simulate Construction
- Simulate and Optimize Scheduling
- Automate Whole-project Quantification
- Create Animations
- Identify and Coordinate Clashes and Interferences
- Communicate Design Intent
- Publish Models
AUDIENCE
Advanced Revit users.
PREREQUISITES
Revit Fundamentals for All Disciplines course.
COURSE CONTENTS
01 - Managing Files in Revit and Using Navisworks to Create the NWC Files
- Open the file TownHouse
- Changing Column Attachment
- Grouping the Floor, Columns, and Roof
- Converting a Group into a Link
- Editing the Wall Profiles
- Changing the Link Referene Type to Attachement
- New Deafult Metric
- Linking the TownHouse and Aligning Levels
- Modeling the Architectural Floor and Adding Furniture
- Saving the File
- Starting Navisworks and Opening the TownHouse
- Appending the TwonHouseStructure and TownHouseInterior Files
- The Selection Tree
- The WNC Files Created by Navisworks
- Saving the File as WNF
- Editing the File in Revit and Saving
- Refreshing the file in Navisworks
- Download Lesson 01
02 - Using Revit to Export the NWC Files
- Downloading the Autodesk Navisworks NWC File Export Utility
- Navisworks NWC File Export Utility
- Opening the MEP File and Exporting It as NWC - Navisworks Settings No Links
- Opening the Architecture File and Exporting It as NWC - Navisworks Settings No Links
- Opening and Appending the WNC Files in Navisworks
- Using Revit to Export the MEP File with Links
- Using the Navisworks Options Menu: File Readers to Open Revit Files with Links
- Opening the MEP File with Links and Saving the WNF File
- Save the File as NWD to Create File Independent of Links
- The Selection Tree
- View: Grid, View Cube, Navigation Bar
- The Quick Access Bar, the Ribbon, the Application Menu
- Download Lesson 02
03 - The Interface
- What Is Navisworks
- Overview of the Interface
- Customizing Workspaces
- Basic Viewing Tools
- Viewpoints
- Consolidating the Model
- Aligning Models
- File Units
- File Transformation
- Civil 3D/Revit Coordination
- Saving and Retrieving Views
- Editing Viewpoints
- Organizing Viewpoints
- Sectioning the Model
- Transforming Sections
- Setting View Options
- Render Style Modes
- Displaying Grids
- Download Lesson 03
04 - Analyze Models
- The Selection Tool, the Selection Box
- Selecting Items, Selecting Similar Items
- Selection Sets, Managing Selection Sets
- Investigating Properties, Quick Properties
- Viewing Properties, Adding User Data
- The Selection Inspector
- Using the Selection Tree
- Selection Resolution
- Interface, Selection Options
- Setting the Viewing Order: Standard, Compact, and Properties
- Using Quick Find
- Finding Items and Saving Search Sets
- Hiding and Unhiding Items
- Isolating Items
- Setting Up Appearances
- Modify Appearances Globally
- The Appearance Profiler
- Download Lesson 04
05 - Reviewing and Marking Up the Model
- Measure and Snapping Options
- Using Measuring Tools
- The Measure Tools Window
- Clearing Measurements
- Working with the Locking Options
- Converting Measurements to Markups
- Renaming Viepoints Created by Markups
- The Shortest Distance Created Between Two Selected Objects
- Marking Up Scenes for Review
- Erasing Markups, Refreshing the Scene
- Adding Text to Viewpoints
- Using Tags to Add Markers and Keep Track of Tagging Date and Author
- Adding Comments to Viewpoints, Sets, and Tags
- Finding Comments
- Merging Comments from Other Viewers
- Download Lesson 05
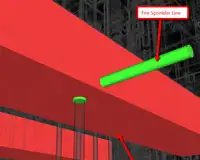
06 - Clash Detection
- Using Revit to Open the Revit File and Taking Measurements
- Exporting Using the Add-ins Externnal Tools
- Using Navisworks to Open the NWC File
- The Clash Detective
- Checking Columns Vs Walls
- Setting the Rules and Selecting the A Vs B
- Choosing What to Include
- Running the Test Using the Hard Option
- Reviewing and Viewing the Results
- Checking Columns Vs Windows
- Checking Clearance Between Columns
- Saving the .NWF File and Closing Navisworks or New File
- Using Revit to Correct the Clashes, Save the File, and Re-Export the NWC
- Re-Open the NWF in Navisworks, Update All the Tests, and Make Compact
- --------------------------------------------------------------
- Creating Hard and Clearance Tests
- Reviewing Clash Results
- Viewing, Settings, Highlighting, Isolating, and Focusing
- Assigning Clash Fixes
- Setting the Clash Status
- Grouping, Commenting, Sharing, and Reporting
- Incorporating Model Updates
- Importing and Exporting Clash Tests
- Download Lesson 06
07 - Work in Progress - Scheduling - 4D BIM
- Hiding Unecessary Elements in Revit
- Exporting the NWC File
- Opening the NWC in Navisworks
- Creating Sets and Saving Viewpoints
- -----------------------------------
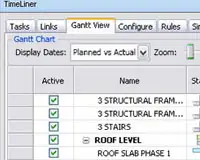
- The Timeliner
- Setting the Date Format Using the Tiemliner Options
- Adding the Existing Configuration
- Defining a New Appearance
- The Tasks Tab
- Attaching Sets
- Attaching Selections
- Scheduling Existing Tasks
- Scheduling Construction Tasks
- Scheduling Demolish Tasks
- Experimenting with Simulation
- ------------------------
- The Data Sources Tab
- Exporting to Excel
- Importing from Excel
- Adding Costs to Tasks
- The Simulate Tab
- Simulation Settings
- Combining the Timeliner and the Animator
- Exporting the Animation
- Download Lesson 07
8 - Animating
- Animating Viewpoints
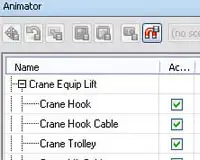
- The Animator Tab
- Recording Animations
- The Animator Window
- Adding Scenes
- Adding a Camera
- Adding Keyframes
- Animating the Garage Door
- Animating the Car
- Adding Additional Scenes
- Exporting
- Download Lesson 08
9 - Quantification
- Quantification for Structure Engineers
- Opening the NWD File
- Saving Sets
- Setting Up a Quantification Project
- Using the Uniformat Catalog
- Importing Catalogs
- Quatification by Sets
- Exporting to Excel
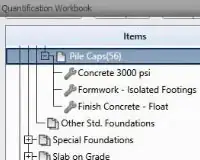
- Quantification Workbook
- Item and Resource Management
- Creating Groups and Items in the Item Catalog
- Creating Resources in the Resource Catalog
- Adding Resources to the Item Catalog
- Copying Groups and Items in the Item Catalog
- 3D Model and Virtual Takeoffs
- Object Selection for Takeoff
- Model Takeoff
- Virtual Takeoff
- Working with Takeoff Viewpoints
- Managing Takeoff Data
- 2D Takeoffs
- Analyzing Takeoff Data
- Exporting Takeoff Data
- Download Lesson 09
10 - The Scripter
- Scripting
- Creating and Managing Scripts
- Creating and Managing Events
- Creating and Configuring Actions
11 - Rendering
- The Rendering Environment
- The Rendering Workflow
- Managing Materials
- Applying Materials
- Material Mapping
- Lighting
- Exposure Control
- Photorealistic Rendering
12 - BIM 360 Glue
- Administering Projects
- Appending Projects
- Sharing